
Mobilink GPRS/EDGE Settings for Android Phones

Mobilink Indigo (may be for Jazz users as well) users who have recently got an Android phone might have some trouble setting up the GPRS/EDGE on your phone. Well, I’m a Mobilink user as well and figured out where and what APN settings to put in.
Follow the steps below to get your GPRS/EDGE working on your Android phone!
- Go to Settings > Wireless & networks > Mobile networks >Access Point Names.
- Press the ‘Menu’ key and select “New APN”.
- Now use the following settings:
- Name: Mobilink (anything you like)
- APN: connect.mobilinkworld.com
- MCC: 410 (should be there by default)
- MNC: 01 (use whatever is there by default)
Earlier today, I shared Mobilink GPRS/EDGE settings for Android phone users. Well, I also found out Telenor’s settings for GPRS/EDGE.
Just follow the steps below to enable Telenor GPRS/EDGE on your Android phones:
- Go to Settings > Wireless & networks > Mobile networks >Access Point Names.
- Press the ‘Menu’ key and select “New APN”.
- Now use the following settings:
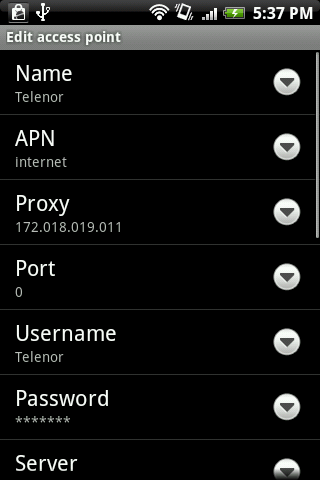
- Name: Telenor (anything you like)
- APN: internet
- Proxy: 172.018.019.011
- Port: 0 (or 8080)
- Username: Telenor (case-sensitive)
- Password: Telenor (case-sensitive)
- MCC: 410 (should be there by default)
- MNC: 06 (use whatever is there by default)

Follow the steps below to get GPRS/EDGE working on your Android phone!
- Go to Settings > Wireless & networks > Mobile networks >Access Point Names.
- Press the ‘Menu’ key and select “New APN”.
- Now use the following settings:
- Name: Ufone Internet (anything you like)
- APN: ufone.internet
- MCC: 410 (should be there by default)
- MNC: 01 (use whatever is there by default)
- You can leave all the other fields blank as they are and save these settings.

Follow the steps below to get your GPRS/EDGE working on your Android phone!
- Go to Settings > Wireless & networks > Mobile networks >Access Point Names.
- Press the ‘Menu’ key and select “New APN”.
- Now use the following settings:
- Name: Zong Internet (anything you like)
- APN: zonginternet
- MCC: 410 (should be there by default)
- MNC: 01 (use whatever is there by default)
- You can leave all the other fields blank as they are and save these settings.